

Before we send any instrument to a customer, our technical team makes sure the unit is in good working order, runs a calibration, and checks all the parts.
Encountering the “O2 Sensor – Zeroing” Error
Recently, one of our technicians ran into a problem with a Testo 350 combustion analyzer. He powered up the unit, and it started going through its standard tests. Everything was going fine, and then he got the error code: O2 Sensor – Zeroing. He turned the device off and back on again (an IT guy trick), but the error stayed. The sensor wasn't old, so it should have worked fine.
Common Causes of the "O2 Sensor – Zeroing" Error
Understanding the root cause of this error can help in troubleshooting more efficiently. Some common reasons include:
- Loose or improperly seated sensor connections
- Sensor contamination from dust or residue
- Sensor reaching the end of its lifespan
- Calibration drift due to prolonged use
- Faulty or outdated firmware
Troubleshooting the “O2 Sensor – Zeroing” Error
So how did he solve the issue?
The ultimate solution is to replace the sensor. But first, knowing the sensor was still fairly new, he tried another trick that our IT guy refers to as "jiggle the cords". By that, he means to unplug the parts and plug them back in again, to make sure all the connections are good. In this case, it meant re-seating the sensor to make sure it was connecting properly.
Resolving the “O2 Sensor – Zeroing” Error
When our technician re-seated the sensor and powered the machine on again, it zeroed properly. Clearly, the sensor wasn't fully connected into the board, and the error was a result of the failed connection, not of a bad sensor. If, after re-seating the sensor, the error still showed up, the tech could have put the sensor into another analyzer to see if the same error occurred. Luckily, one procedure solved the problem.
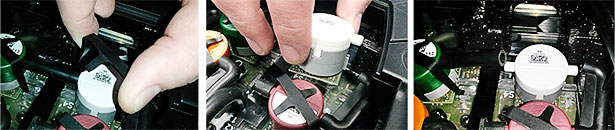
Steps to Re-Seat or Replace the O2 Sensor on the Testo 350
So, whether you're replacing a sensor or just re-seating it, here's what you do:
- Power the instrument off and remove the sensor cover on the back.
- Remove the clip that holds the sensor in place.
- Remove the sensor completely.
- Put the sensor back into the slot (or replace with the same type of sensor), and make sure it's firmly seated. In this case, the sensor was going into Slot #4, which only accepts O2 sensors.
- Replace the clip.
- Close the cover.
- Power the instrument on again and let it run through its sensor detection.
Testo 350 Sensor Slot Guide
If you do have to replace sensors in the Testo 350, please remember that your sensors have to be connected into their proper dedicated slots:
- Slots 1, 2, and 3: NO2, H2S, CO, COlow, NO, NOlow, and SO2
- Slot 3: also accepts a CO2-(IR) sensor
- Slot 4: O2 only
- Slots 5 and 6: CO, COlow, NO, NOlow, SO2, CxHy
Preventive Maintenance Tips for the Testo 350 O2 Sensor
To minimize downtime and extend the life of your sensor, consider these best practices:
- Regularly check and clean sensor ports
- Ensure proper storage of the analyzer when not in use
- Run periodic calibration checks
- Use high-quality replacement sensors
Why Renting the Testo 350 from RAECO Simplifies the Process
This is just one of the reasons why our customers tell us that renting makes their job easier. The customer who got the Testo 350 was able to start his measurements right away, and not worry about replacing sensors or troubleshooting the unit. All the maintenance work had already been done for him.
Learn More About the Testo 350 Emission Analyzer
If you're looking for a reliable emissions analyzer, the Testo 350 offers precision and ease of use for combustion analysis and emissions monitoring. Whether you need short-term testing or long-term compliance monitoring, we have solutions that fit your needs.
Learn more about the Testo 350 combustion emissions analyzer or see our full offering of emissions monitors and combustion analyzers.

