Getting data from a 3M QUESTemp II personal heat stress monitor to your Windows 7 PC
With the extreme heat this summer, several customers have made use of our new 3M QUESTemp II personal heat stress monitors. But with everything, testing is only half the battle. What’s really important is the data the monitor collects.
Pages 8 and 9 of the QTII user manual offer basic instructions for pulling the data from the QUESTemp using your Windows PC and HyperTerminal.
But if you’re running Windows 7, that’s no longer an option. HyperTerminal doesn’t come pre-installed. So what do you do?
I tried installing HyperTerminal on my own machine under Windows 7, in both 32-bit and 64-bit version, but it’s not an easy task. So I asked our in-house IT guy, and he suggested a free Telnet/SSH program called PuTTY. You can download PuTTY here. Under "For Windows on Intel x86", right-click and save the first file, PuTTY.exe. There’s no installer, it just runs from wherever you save the file. (I saved it to my desktop.)
Connect your QuesTemp II to your PC
If you have an RS232 serial port on your PC, you can connect the download cable from the QUESTemp II to it. Otherwise, you can use an RS232 to USB adapter (we include one in every QTII rental kit) and, if needed, install the driver. Then, you connect the QTII to the serial download cable, connect that cable to the adapter, and connect the adapter to your PC’s USB port. So now you have the right software on your PC, and you have the heat stress monitor connected.
Next, you need to set up PuTTY to get your data.
Step 1: Find out what COM port your computer assigned to the QUESTemp.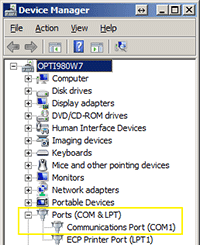
Go to Start > Control Panel > Device Manager, and click the + at Ports (COM and LPT)
Now, launch PuTTY.
(If you get a Security Warning saying “The publisher could not be verified. Are you sure you want to run this software?” don't worry. Just unclick [X] Always ask before opening this file, and click the [RUN] button. It's safe.)
The PuTTY configuration page will open.
In the right-side panel, Under “Specify the destination”, click the radial button for (●) Serial.
Change the “Serial Line” to the COM number you found in Control Panel, and keep the Speed setting to 9600. We’ll match this speed on the QTII later.
Now, click on Logging in the PuTTY Category menu on the left.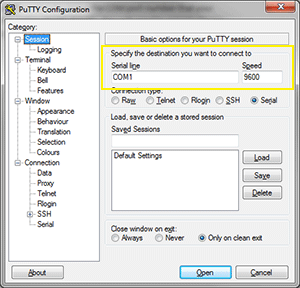
Click [x] All session output Give the log file a name with a .txt extension, and save it where you want (standard Save As… functionality works here). I usually use the serial number of the unit as my file name.
Be careful. If you’re downloading data from more than one QUESTemp II, you’ll want to change the log file name before each new download session.
Leave the rest of the settings in this window as they are. No need to make any other changes.
Now, in the Category (left) menu, go all the way to the bottom option, Serial. 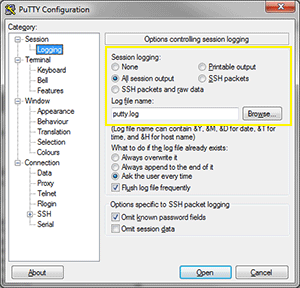
In the right pane, change the Stop bits to 2. With all these configuration changes done, go back to Category > Session, and give this config a name, so you can use it again as needed.
Just remember that you’ll need to change the log file name for every download you do.Otherwise PuTTY will over-write your test data.
Download the Data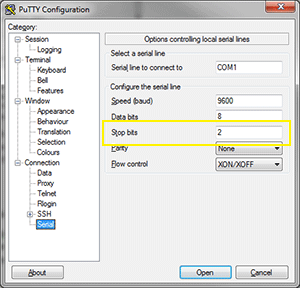
Now, click [OPEN] in your PuTTY window. You’ll see a black box with a blinking cursor.
Grab your QUESTemp II device and push the Print/Data button (middle button, top row, just below the QUESTemp’s digital display).
The screen will show the baud rate, which SHOULD be 9600. If not, push [Print/Data] again so the numbers blink. Then, use your Up and Down arrows to change the rate to 9600. Push [Enter].
On your PC, you’ll see the data scroll through the black window, and will be written to the log file you set up in PuTTY.
Once that’s done, you can disconnect the QTII from your computer, open the data file, and use it to deliver your results wherever they need to go.